
Pricing


AI writer

Taplio
MCP V2
New: Engage tools
Taplio MCP V2 now available, try it out
Your AI can now comment and reply for you. It finds the posts worth engaging, drafts in your voice and queues them on your Taplio account. Nothing posts until you confirm.

LinkedIn carousels: how to create and post them

September 17, 2026

14
min read

 Open in ChatGPT
 Open in Claude
 Open in Perplexity
Key Takeaways
- How to create a LinkedIn carousel: Build the slides in a tool such as Taplio's free carousel maker (watermarked unless you subscribe) or Canva, export them as a single PDF, then upload it as a document post through LinkedIn's Add a document option, a workflow that runs in 6 steps with no official minimum slide count.
- Design tool options: Taplio's free carousel maker turns a topic, tweets or Reddit posts into a downloadable PDF, Taplio's paid carousel generator starts from an existing post, an article or a YouTube link and applies a saved brand kit, Canva offers a larger general template library, and PowerPoint or Keynote suit anyone who already thinks in slide decks.
- The decisive limit: LinkedIn accepts one document per post, at most 100 MB and 300 pages, and sets no minimum slide count, per LinkedIn's own Help pages, so a 4 to 10 slide deck sits well inside the limits.
- What to check before publishing: every slide is the same pixel size, the file exports as a single PDF, the last slide names one specific action, and the caption invites a swipe instead of repeating the hook slide word for word.
- The decision rule: pick Taplio's carousel generator when starting from an existing post or idea, pick Canva or Figma for full manual design control, and write the caption as a second hook rather than a restatement of slide one.
A LinkedIn carousel is a document post: a PDF, PowerPoint or Word file uploaded as one attachment so readers swipe through it slide by slide instead of scrolling past a single image. Making one comes down to six steps: plan the slide sequence, design each slide, export a single PDF, upload it as a document, write the caption that goes with it, then publish. This guide walks through all six, plus the caption and post-publish steps most creation guides skip. The exact pixel sizes and file limits live in a separate guide, linked in the next section.
What is a LinkedIn carousel
A LinkedIn carousel is a document post, a single PDF, PowerPoint or Word file that LinkedIn renders as a set of swipeable pages inside the feed. It is not a series of separate image uploads, LinkedIn treats the whole thing as one attachment, the same way it treats any other document someone shares.
That single-file rule is what makes a carousel different from a normal image post. You build every slide first, combine them into one file, then upload that file once. For the exact pixel dimensions, ratio and file-size limits, see our LinkedIn carousel size guide. This article covers everything from planning the slides to publishing the post and writing the text that goes with it.
LinkedIn also sells a paid Sponsored Content format called a carousel ad, built inside Campaign Manager on its own separate spec sheet. Every step in this guide covers the organic, unpaid document post version that anyone can publish from a personal profile, Page or Group, not the paid ad format.
The LinkedIn carousel workflow, from idea to published post
The LinkedIn carousel workflow has six steps in order: plan the slide sequence, design each slide, export a single PDF, upload it as a document, write the caption, then publish. Skip the planning step and the carousel looks unfinished, since no design tool can fix a sequence that never gave each slide a job.
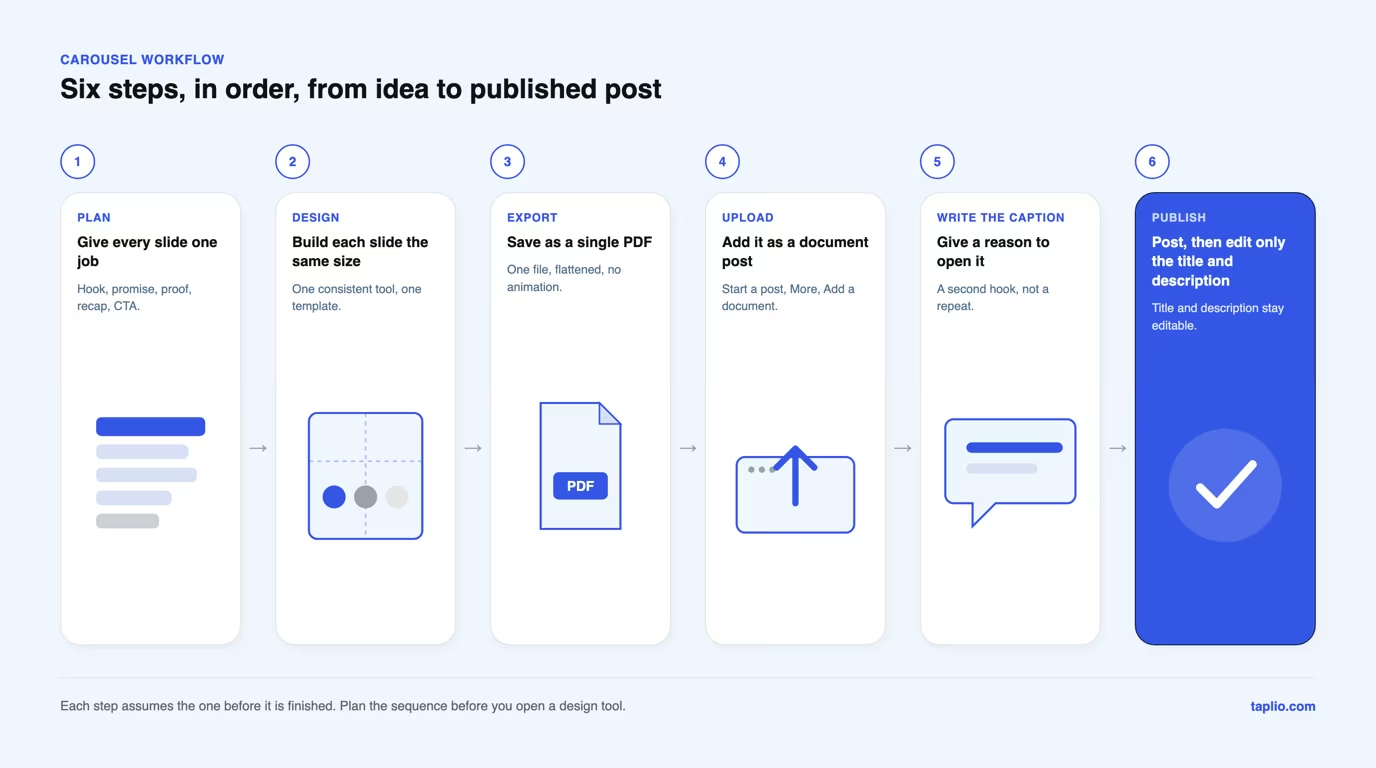
The order matters because each step assumes the one before it is finished. Design slides before the sequence is planned and you redesign at least one of them once the roles stop making sense. Write the caption before the deck is final and you risk describing content that changes by export time.
The next six sections follow that order, one step each, so you can build your own carousel alongside them.
How to plan your carousel slides
Planning a carousel means assigning each slide one job before you open a design tool, since a slide with no job is the one readers swipe past. A working carousel needs a hook, a promise, several proof slides, a recap and a closing CTA, in that order.
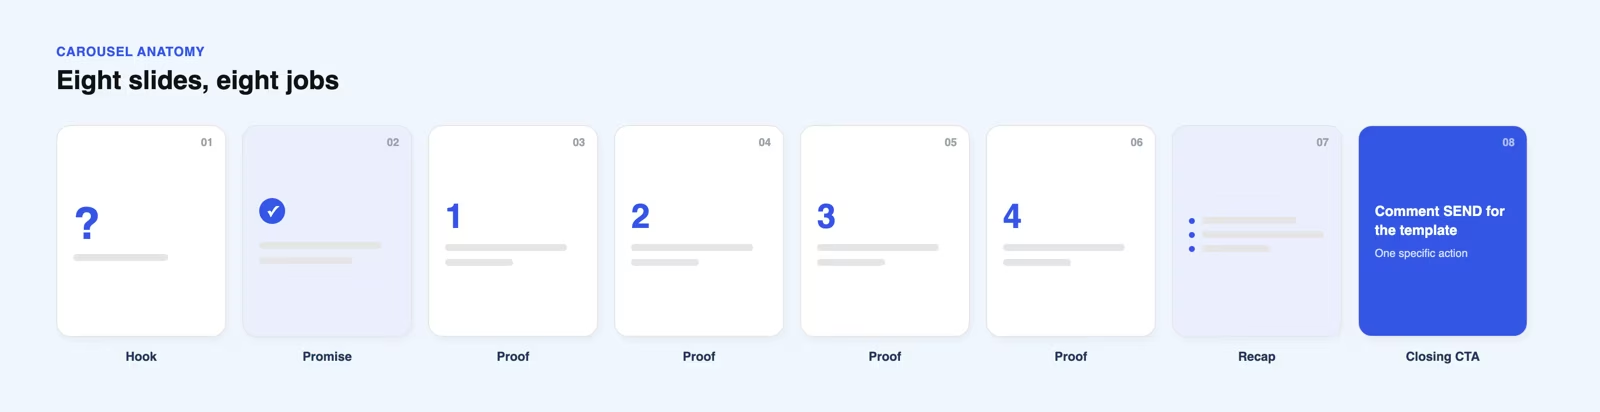
Write the job for every slide in one line before you design anything, the table below is a template you can fill in with your own topic.
| Slide | Job | What to write |
|---|---|---|
| 1, hook | Stop the scroll | A question or a claim specific enough that the reader has to know the answer |
| 2, promise | Say what the reader gets | One sentence naming the outcome, so swiping forward feels worth it |
| 3 to 6, proof | Back the promise with specifics | One idea per slide: a step, a number, a named example, never a vague claim |
| Second to last, recap | Remind the reader what they just learned | A one-line summary of the proof slides, not a new idea |
| Last, CTA | Name one next action | Comment, follow or click, never a silent thank-you slide |
LinkedIn sets no minimum slide count, only a 300-page ceiling, so the length is yours to pick. Plan on 4 to 10 slides for most topics: fewer than four leaves no room for a hook, a promise, proof and a CTA all at once.
The number of proof slides is the one flexible part of the structure. A simple claim might need only one proof slide, while a step-by-step process could take four or five, as long as every proof slide still carries exactly one idea rather than restating the promise slide in different words.
How to design your carousel slides
Designing a carousel means building every slide as one consistent, LinkedIn-ready page inside a tool that can export the whole set as a single PDF. The tool matters less than the consistency, every slide needs the same size, the same fonts and the same margins.
| Tool | Free tier | LinkedIn-ready PDF export | Templates | Best for |
|---|---|---|---|---|
| Taplio carousel maker | Yes, with a watermark unless you subscribe | Yes, Download Carousel button | Themes and slide types built for LinkedIn carousels | Turning a topic, tweets or Reddit posts into a finished PDF in minutes |
| Canva | Yes | Yes, via Download as PDF | Yes, large general template library | Readers who already design other assets in Canva |
| PowerPoint or Keynote | Depends on the licence you already have | Yes, built-in Export/Save As PDF | Limited, mostly presentation-style | Readers who think in slide decks already |
| Google Slides | Yes, free with a Google account | Yes, via File then Download then PDF | Limited, basic layouts | Quick collaborative drafts before a final design pass |
| Figma | Yes | Yes, via Export frames to PDF | Community templates, variable quality | Readers who want full control over type and layout |
Taplio's free carousel maker is built for this job: enter a topic and let the AI draft the slides, or paste tweets, Reddit posts or image URLs to turn them into slides, then edit the cover, the body slides and the outro inline before downloading the PDF. The free version prints a small "Made with taplio.com/carousel" line on each slide, which disappears for Taplio subscribers.
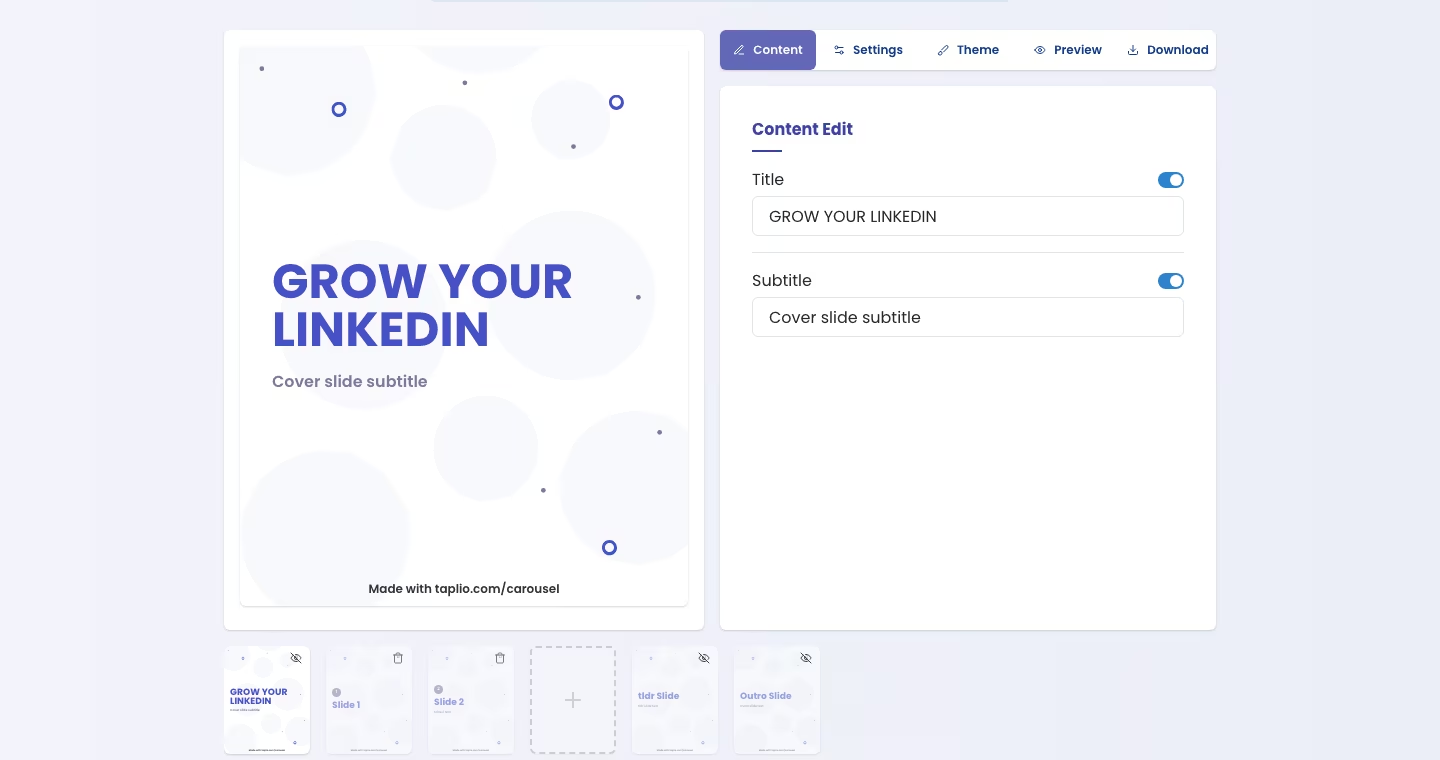
For the paid version, Taplio's carousel generator takes a rough idea, an existing post, an article link or a YouTube video and structures it into a cover hook, body slides and a closing CTA. It then applies your saved colors and logo in one click before you export the PDF or create the post straight from it.
Keep the working file from whichever tool you use, not just the exported PDF. A working file lets you fix a typo or swap a slide later without rebuilding the whole deck, which matters since LinkedIn never lets you edit the document itself once it is posted.
LinkedIn also lets viewers download your document as a PDF for accessibility, regardless of which tool built the original file. That download option is automatic once you publish, so there is nothing extra to configure in your design tool for it to work.
How to export your carousel as a PDF
Exporting your carousel means saving every slide as one PDF file, since LinkedIn accepts PDF, PPT, PPTX, DOC and DOCX but only one document per post. LinkedIn's help pages recommend converting to PDF whenever possible for the highest quality upload.
Keep every page the same pixel size before exporting. LinkedIn's upload guidance requires PDFs with mixed page sizes to be fit to one size first, so a deck built at different dimensions per slide is a spec violation, not a style choice.
Flatten or merge any layered PDF before uploading, and skip embedded video or animation, since LinkedIn displays anything animated inside a document as a static image instead of playing it. A GIF-heavy slide deck uploads fine and looks frozen.
Oversized images, not slide count, are what push a PDF toward LinkedIn's 100 MB ceiling. Compress photos before you place them in the design tool and the finished file stays small without lowering the quality your reader sees on screen.
How to upload and post a LinkedIn carousel
Uploading a LinkedIn carousel means adding your finished PDF through the same composer you use for any other post, then adding a title before you publish. LinkedIn's help center lists the desktop sequence exactly as follows.
Click Start a post in the sharebox at the top of your LinkedIn homepage. Click More in the pop-up window, then click the Add a document icon. Click Choose file to select your PDF from your computer, or upload it from Dropbox or Google Drive.
Select the file, then add a title to your document and click Done. Add a description to the post, hashtags and mentions are optional here, then click Post.
The title is not optional decoration. LinkedIn's help page says to add one so members know what the document is about, and a missing title is one of the four causes it lists for a failed upload, next to file type, size and page count.
On mobile, the sequence is the same idea with different taps: tap Post, tap the More icon, then tap Document, select the file from your device or a connected cloud service, add a title and tap Next, then add a description and tap Post. Either path ends the same way, one document, one title, one description.
How to write the post text that goes with your carousel
Writing the post text for a carousel means giving the reader a reason to open the document at all, since the caption is what shows in the feed before the first slide does. Treat it as a second hook, separate from the one already on slide one.
Open with the outcome or the tension your carousel resolves in one line, the same way you would open any other post. Repeating the hook slide word for word wastes the caption, instead name what is inside without giving away the payoff.
Close the caption with a direct instruction to swipe, since the reader has to open the document before any slide beyond the first can do its job. A caption that reads like a headline for a link, rather than an invitation to open an attachment, gives the reader no reason to swipe.
Keep hashtags to two or three relevant ones and skip a wall of them at the end. The caption's job is to sell the swipe, not to repeat what the carousel itself already says, and how the algorithm treats early engagement on that caption is covered in our LinkedIn algorithm guide.
Write the caption so it still makes sense on its own, since it is the version of your post that shows up when someone reshares it, comments on it, or finds it through search without opening the document first. A caption that only makes sense next to slide one has already lost that reader.
What to do after you publish your carousel
After you publish a carousel, you can still edit its title and its post description, but you cannot change or edit the document itself, per LinkedIn's own help pages. If you find a typo on slide three, deleting the post and reuploading a corrected file is the only fix.
You can find every document you have uploaded on the Activity page of your own profile, which is useful for reusing a strong carousel later or checking exactly what you posted. LinkedIn also allows only one document per post, so a follow-up carousel needs its own new post.
Plan your next post before engagement on the current carousel drops off. Scheduling that follow-up in advance, through a tool like Taplio's post scheduler, keeps a carousel from being a one-off rather than part of a sequence.
If an upload fails outright rather than publishing with a mistake, LinkedIn's own troubleshooting steps are to recheck the file type, confirm the file is under 100 MB and 300 pages, and confirm the document has a title. Most failed uploads trace back to one of those four checks rather than a platform outage.
Mistakes to avoid when posting a LinkedIn carousel
The first mistake is text sized for a desktop screen. LinkedIn's feed renders your document at a fraction of its export size on mobile, so check every slide on a phone before posting and enlarge anything you have to squint at.
The second is a final slide with no CTA. A carousel that ends on a summary or a plain thank-you slide gives the reader nothing to do, which wastes every swipe it took to get them there.
The third is mixed page sizes or embedded animation inside one file, both of which LinkedIn's own upload guidance calls out directly. Build the deck at one consistent size and treat every slide as a static page.
The fourth is publishing before proofreading. LinkedIn lets you edit a document post's title and description afterward but never the document itself, so a typo on an early slide means deleting the post and starting over.
The fifth is skipping the caption. A carousel with a strong first slide and a caption that just repeats the title gives the reader no reason to tap into the document at all.
The sixth is treating the design tool as the finish line. A carousel that looks finished on a laptop screen but was never planned slide by slide first reads as a nice-looking deck with no argument, since the design pass polishes whatever structure it was given.
One LinkedIn carousel worth copying
The carousel below, a recruiter's countdown of four interview red flags, gives every slide one job and closes on a single, specific action. It is a fictional but realistic example built to show the structure, not a screenshot of a real account.
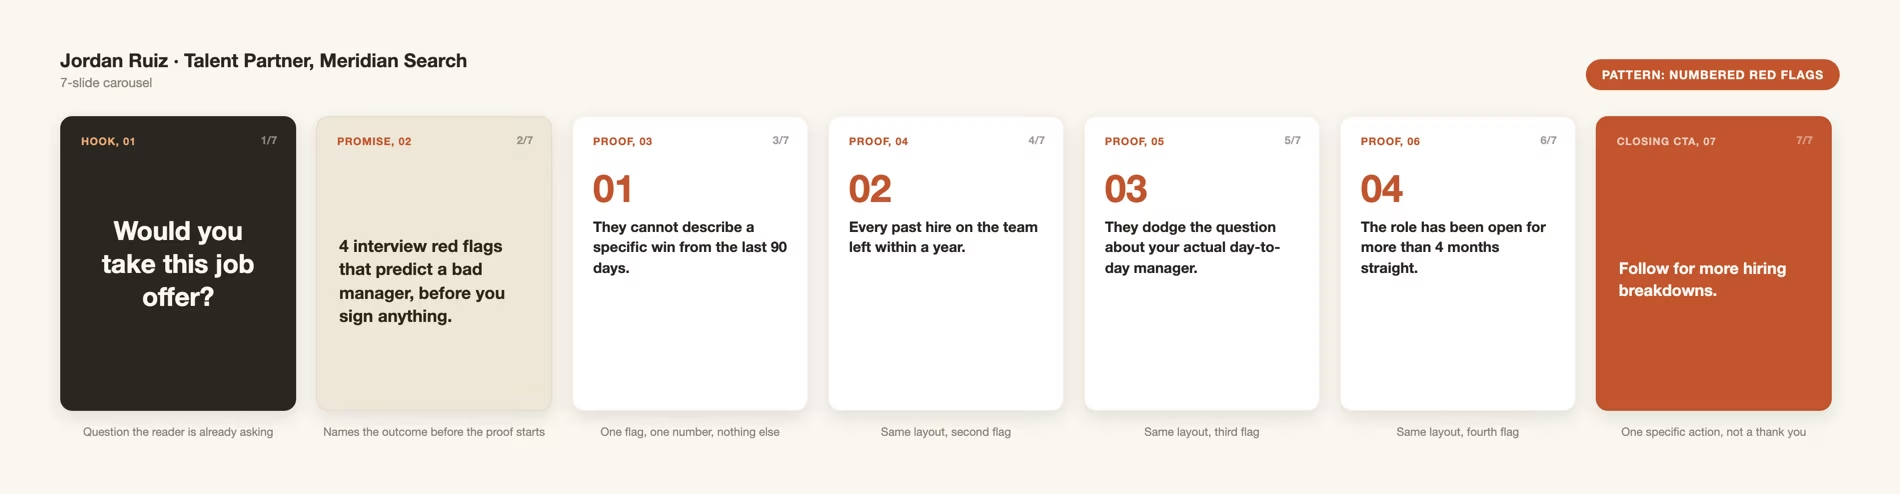
The hook slide asks a question the target reader is already asking themselves, rather than announcing the topic. The promise slide states the outcome in a single line, four specific things to watch for, before the proof slides count them down.
Each proof slide keeps one red flag per page, large type, short text, nothing else fighting for attention. The closing slide names one action, follow for more hiring breakdowns, instead of ending on a plain thank you.
Notice what stays constant across all seven slides: the same fonts, the same margins, the same accent color used only for the flag numbers. That consistency is what makes a carousel feel like one document instead of seven separate images someone stitched together.
The countdown structure works for almost any list-shaped topic, mistakes to avoid, tools to try, questions to ask, not only interview red flags. Swap the topic and the promise slide, keep the one-idea-per-slide rule, and the same seven-slide shape holds up.
Frequently asked questions
What is a carousel on LinkedIn?
A LinkedIn carousel is a document post, a single PDF, PPT, PPTX, DOC or DOCX file that members swipe through page by page inside the feed. It uploads and displays as one attachment, not as a series of separate images.
Are carousels still good on LinkedIn?
Yes, document posts remain a supported native format on LinkedIn, documented on its own help pages with no replacement announced. Whether one specific carousel performs well depends on the same factors as any post: a clear hook, a caption worth reading and a topic your audience cares about.
Can carousels be used on LinkedIn?
Yes, you can upload a carousel from your personal homepage, a Group or a LinkedIn Page, using the same Add a document option in the post composer either way. The upload steps and file limits are identical across all three.
What is the 3/2/1 rule on LinkedIn?
There is no official 3/2/1 rule published by LinkedIn, and it does not apply to carousels or document posts specifically. It circulates informally in creator advice with different meanings depending on who is using it, so treat it as opinion rather than a platform rule.
Can I edit a LinkedIn carousel after posting it?
You can edit the title and the description of the post, but LinkedIn does not let you change or edit the document itself once it is live. Fixing a mistake inside the carousel means deleting the post and uploading a corrected file as a new one.


Keep reading
All articlesRelated Articles

.avif)
Your Linkedin AI coach is waiting for you
Join 12,000+ creators who let their coach turn the blank page into a plan and watch their audience compound.
7-day free trial · 30 day money back · Cancel anytime
AVG. VIEWS
2,979
-1.5%
ENGAGEMENT
3.2%
+0.8%

Free Monthly Report
How does your LinkedIn compare?
Get free monthly benchmarks on reach, engagement, and content format performance.
Get the Benchmark