Trying to reach out to people outside your LinkedIn network?
LinkedIn InMail helps you connect with potential clients, employers, business partners, or industry professionals without a mutual connection or their email address.
Learn what LinkedIn InMail is, how it works, and how to write messages that get you replies.
What Is LinkedIn InMail?
LinkedIn InMail is a paid feature that helps you reach out to people who are not 1st-degree connections.
Instead of asking for an introduction or searching for their email address, InMail allows you to send them a direct message, even if you have no mutual connections.
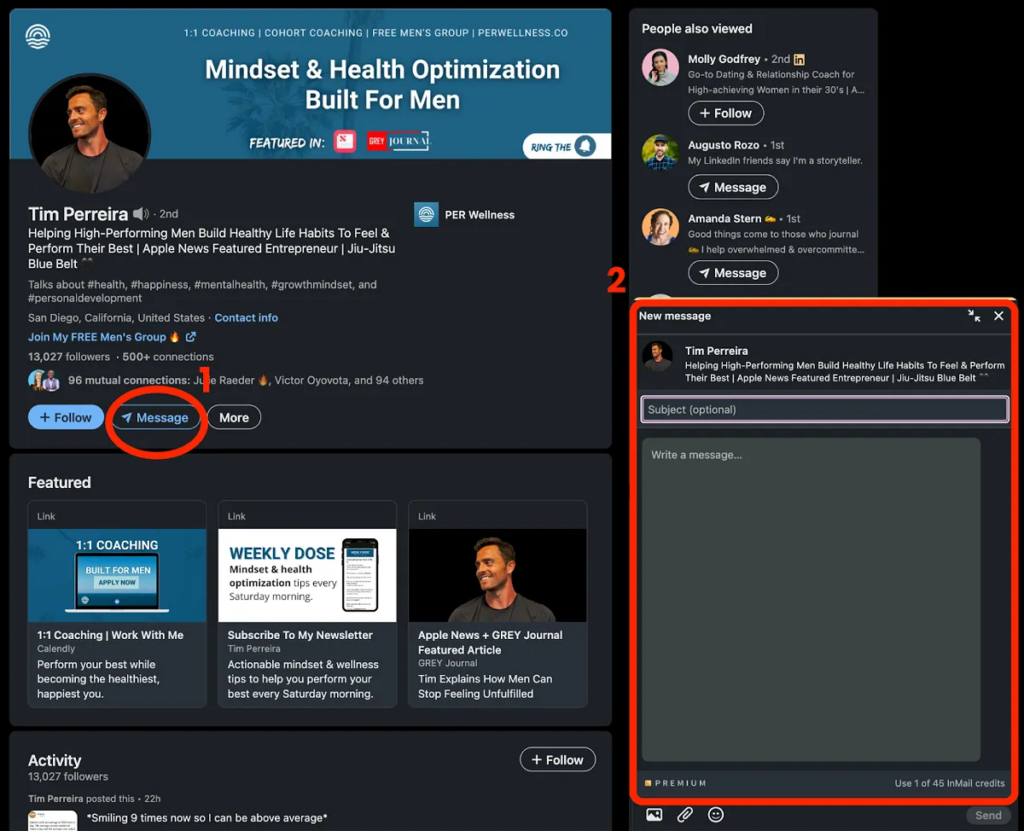
Once you have a LinkedIn Premium account, every time you browse to a 2nd or 3rd-grade connection, you’ll see the ‘Message’ button at the top of their profile.

On the other hand, this is how the recipient receives the InMail message.

And, for the record, these are private messages, straight into the inbox of the recipient.
What Are LinkedIn InMail’s Benefits?
- Direct contact. LinkedIn Inmails allows you to send messages directly to anyone on LinkedIn, even if you’re not connected. With more than 65 million companies on LinkedIn, InMails helps you reach decision-makers, recruiters, or potential clients who might otherwise be challenging to contact.
- Better response rates. InMail messages are delivered to recipients’ LinkedIn inboxes and also trigger an email notification. LinkedIn says an InMail is 2.6x more effective in hearing back than email or cold calls.
- Detailed analytics. LinkedIn provides detailed data on your InMail campaigns so you can track open rates, response rates, and other metrics to help you improve your outreach strategy.
Can You Send LinkedIn InMails With a Free Account?
You can’t send InMails with a free LinkedIn account. InMail is a premium feature designed for users with paid LinkedIn subscriptions.
However, there is an exception. You can send InMails to a member who enabled the “Open Profile” premium feature. This feature allows anyone on LinkedIn to contact the Open Profile member, even if they are not a 1-st degree connection.
Note: The Open profile feature is available only on LinkedIn premium accounts.
How Many LinkedIn InMails Can You Send?
The number of InMails credits you receive monthly depends on your LinkedIn subscription:
- Premium Career: 5 InMail credits
- Premium Business: 15 InMail credits
- Sales Navigator Core: 50 InMail credits
- Recruiter Lite: 30 InMail credits
What happens with unused InMail credits?
InMail credits that you don’t use are transferred to the next month. However, there’s a limit on the total number of accumulated InMail credits.
- Premium Career: 15 InMail credits
- Premium Business: 45 InMail credits
- Sales Navigator: 150 InMail credits
- Recruiter Lite: 120 InMail credits
What You Should Know Before Sending LinkedIn InMails
Here are a few details about InMail that you should know before planning your LinkedIn outreach campaign:
Character limits
LinkedIn InMails ‘s subject lines can have up to 200 characters. The body is limited to 2000 characters.
No follow-up InMails
When sending LinkedIn InMails, the first impression matters. You can’t send follow-up messages until the recipient accepts or responds to your first message.
Additionally, you can’t send another message if they declined the first InMail.
Credits refund
Wondering how to make the most out of your InMail credits? LinkedIn refunds credits for every InMail message accepted, responded to, or declined within 90 days of being sent.
You don’t get credits back if your InMail messages are still pending in the recipient’s inbox.
With limited InMail credits, you shouldn’t waste them on messages that feel generic or boring. Instead, focus on personalizing your message and making it relevant to the recipient.
How to Write LinkedIn InMails That Get Replies
1. Craft an engaging subject line
Your prospect should open your InMail after one quick look. So, keep your subject line short and sweet.

According to lemlist, you should limit your InMail subject line to 8 words or less. You can also improve your chances of getting a reply by adding your prospect’s name, job title, industry, or a specific detail that shows you’ve done your research.
2. Add a personalized intro
Don’t sell right from the start. Make sure your message isn’t too generic by personalizing the greeting with their name. No need to overthink it. “Hey” is a casual greeting that helps you set a friendly tone.
Then, add something about their role or company that shows you’re genuinely interested in connecting with them. Congratulate them on a personal or professional achievement, mention a company milestone, or reference something relevant to their industry.
3. Write a relatable middle
To do this, highlight their challenges and pain points, positioning yourself as part of the solution.
To get more replies, share a story highlighting your prospect’s pain points or challenges. Then, show them how your product or service can be part of the solution.
Make sure to personalize your message as much as possible and demonstrate a clear understanding of their needs.
Demonstrate that you clearly understand their needs and focus on the benefits they can get by partnering with you.
4. Add a strong CTA
Give your prospect a clear next step and drive them to respond with a compelling call to action.
You can encourage them to share their thoughts on a specific topic, invite them to connect, or ask them to book a meeting with you.
5. Sign off
Keep your email signature short and professional. Include your name, job title, company, and other relevant information such as phone number or social media accounts.
Wrapping It Up!
You can only send LInkedIn InMails to your 1-st degree connections unless they enabled the “Open profile feature”.
You need a Premium account to send LinkedIn InMails, and you will get limited InMails credits.
When sending InMails on LinkedIn, focus on personalizing the message and making it relevant to get more replies.
Also, include a strong call to action to guide your prospects to the next step.


