
Pricing


AI writer

Taplio
MCP V2
New: Engage tools
Taplio MCP V2 now available, try it out
Your AI can now comment and reply for you. It finds the posts worth engaging, drafts in your voice and queues them on your Taplio account. Nothing posts until you confirm.

LinkedIn about me template: 5 fill-in-the-blank versions to copy


14
min read

 Open in ChatGPT
 Open in Claude
 Open in Perplexity
Key Takeaways
- LinkedIn about me template: a short About text built on 4 slots (hook, proof, fit, next step) whose bracketed gaps, such as [result with a number], you replace with your own facts, with 5 ready versions for job seekers, founders, freelancers, career changers and students.
- How to add it: click the Me icon, choose View Profile, click the Edit icon in the About section, paste the filled text and click Save, as the LinkedIn Help page on editing the About section describes.
- The length that decides: LinkedIn Help advises limiting the About section to one or two paragraphs, with bullet points allowed, and its About section help pages state no character count.
- What to check before saving: no bracket left in the text, a number or checkable fact in every proof line, a hook that stands alone in the first 2 lines, and a headline that matches the About text.
- The decision rule: start from the job seeker version to land a role, the founder version to sell a company, the freelancer version to win clients, the career changer version to explain a switch and the student version when work history is thin.
A LinkedIn about me template is a short text with brackets, such as [who you help] and [result with a number], that you replace with your own facts. Every good one has four slots: a hook, proof, a fit line and a next step. Five ready versions follow, for job seekers, founders, freelancers, career changers and students, with the rules for filling the brackets. If you want finished texts with nothing left to fill, read how to write a LinkedIn summary.
What every LinkedIn about me template contains
Every LinkedIn about me template has four slots, in this order: a hook, proof, a fit line and a next step. The bracketed gaps inside each slot are the only parts you change, so the structure does the thinking and you supply the facts.
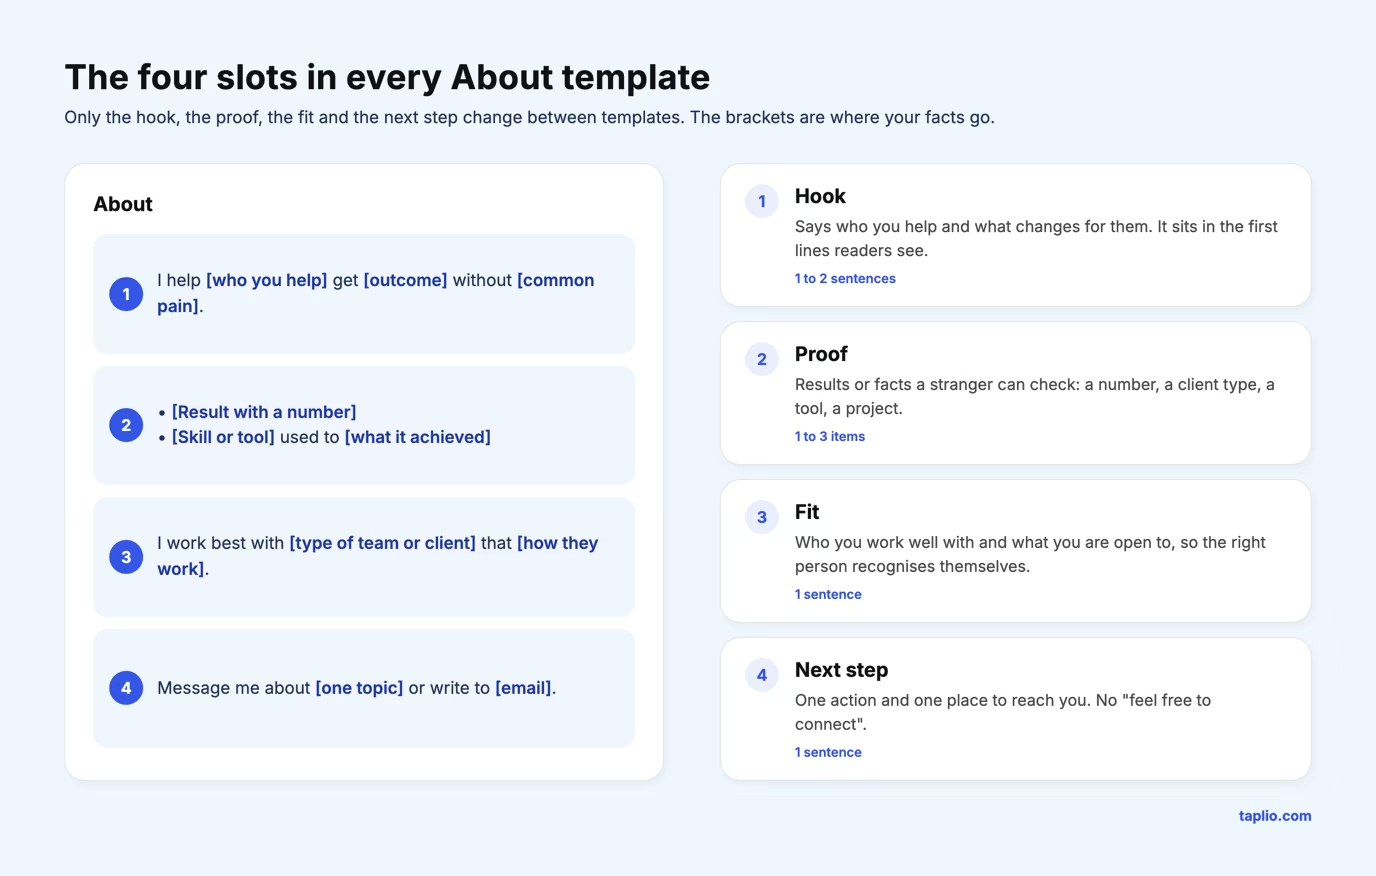
LinkedIn Help describes the About section as the place to express your mission, motivation and skills, and advises limiting the text to one or two paragraphs, with bullet points allowed. Neither LinkedIn Help page on the About section states a character count, so write to the two paragraph guidance and let the editor stop you if you reach its cap.
To paste a filled template, click the Me icon, choose View Profile, click the Edit icon in the About section, paste the text and click Save, as described on the LinkedIn Help page to edit the About section. On mobile, tap your profile picture twice, then the Edit icon in About.
| Slot | What goes in | Length | Brackets you fill |
|---|---|---|---|
| 1. Hook | Who you help and what changes for them | 1 to 2 sentences | [who you help], [outcome], [common pain] |
| 2. Proof | Results or facts a stranger can check | 1 to 3 items | [result with a number], [skill or tool], [timeframe] |
| 3. Fit | Who you work well with, what you are open to | 1 sentence | [type of team or client], [role], [how they work] |
| 4. Next step | One action and one place to reach you | 1 sentence | [one topic], [email or link] |
The order follows how a visitor reads a profile: who the text is for, why you are credible, whether you fit their need, and what to do next. Moving the next step to the top or burying the hook breaks that sequence.
The table gives the budget per slot. Add the four lengths together and you land on 4 to 7 sentences or list items, which fits the one or two paragraphs LinkedIn recommends. More slots would push past that, so every template here stays at four. Skip a slot only when a bracket in it has nothing true to say, and never pad it.
Five LinkedIn about me templates you can copy
Pick the template that matches your situation, copy the text, and replace every bracket before you save. The text under each picture is the same text as the picture, so you can select and copy it.
| Your situation | Start from | Lead with | Fill these brackets first |
|---|---|---|---|
| Looking for a job | Job seeker | The role you want | [target role], [result with a number] |
| Running a company | Founder | The customer problem | [customer type], [common pain] |
| Selling your own services | Freelancer | The client trigger | [problem], [service], [client type] |
| Switching fields | Career changer | The honest reason | [previous career], [new field] |
| No work history yet | Student | The field you aim at | [degree], [project or course] |
Template for job seekers
Use this one when a recruiter should know your target role in the first line. The hook states the role you want, and the proof slot carries three results so the claim is easy to check.
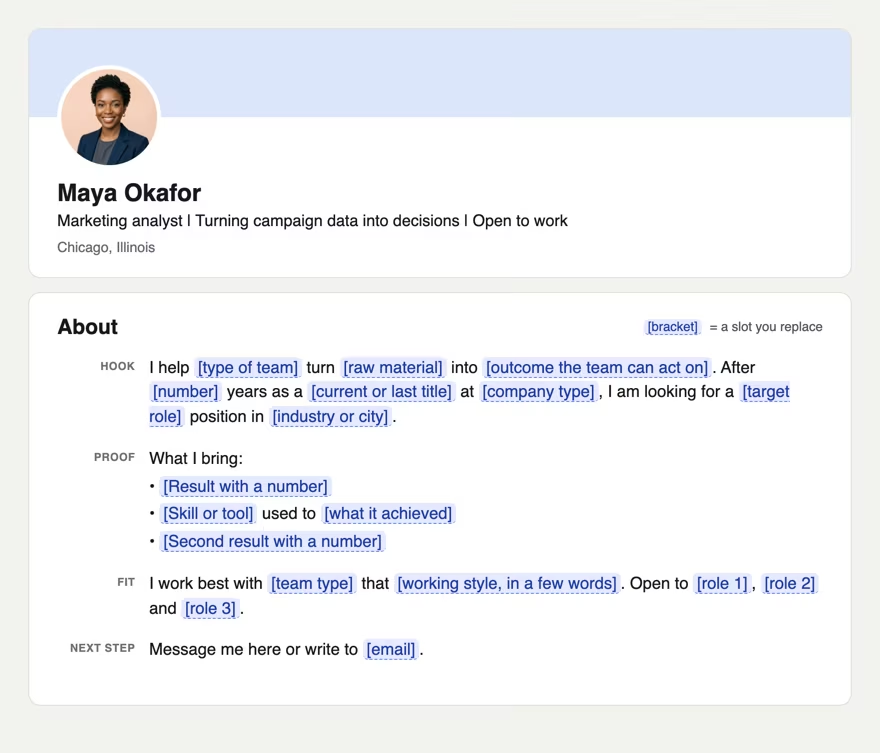
I help [type of team] turn [raw material] into [outcome the team can act on]. After [number] years as a [current or last title] at [company type], I am looking for a [target role] position in [industry or city].
What I bring:
• [Result with a number]
• [Skill or tool] used to [what it achieved]
• [Second result with a number]I work best with [team type] that [working style, in a few words]. Open to [role 1], [role 2] and [role 3].
Message me here or write to [email].
Fill the first bracket of the proof list before any other. If you cannot write a number for it, use the section on empty brackets further down. Then match the target role in your headline so the two agree.
Template for founders
Use this one when the company is the story. It opens with the customer problem, not your title, and ends with one clear way to start a conversation.
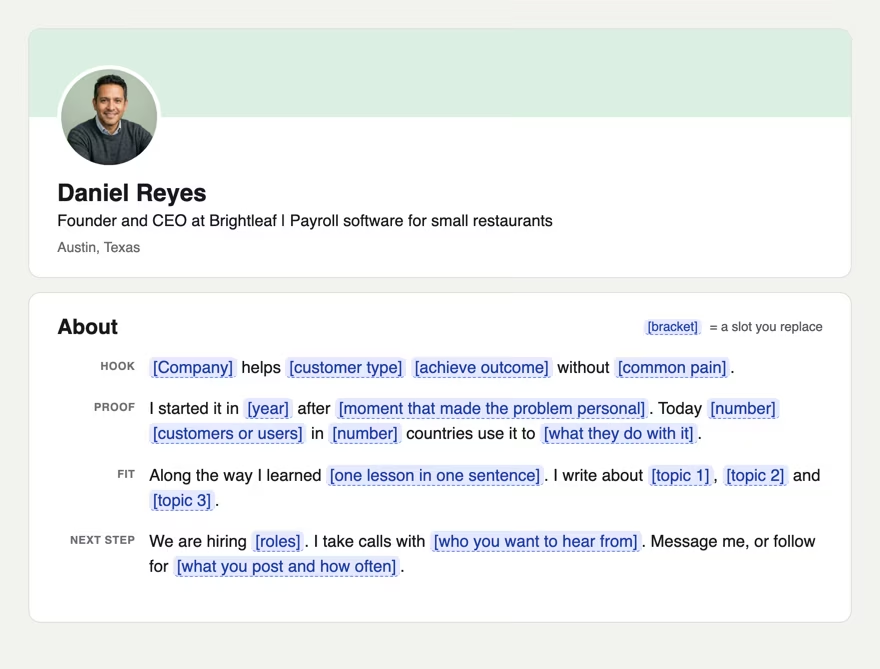
[Company] helps [customer type] [achieve outcome] without [common pain].
I started it in [year] after [moment that made the problem personal]. Today [number] [customers or users] in [number] countries use it to [what they do with it].
Along the way I learned [one lesson in one sentence]. I write about [topic 1], [topic 2] and [topic 3].
We are hiring [roles]. I take calls with [who you want to hear from]. Message me, or follow for [what you post and how often].
A founder About also doubles as a hiring page, so keep the roles bracket current. Keep the lesson in slot three to one sentence. A founder About that tells the whole company history pushes the call to action out of view.
Template for freelancers and consultants
Use this one when prospects land on your profile before they message you. It lists services as outcomes, then gives one recent result and one booking line.
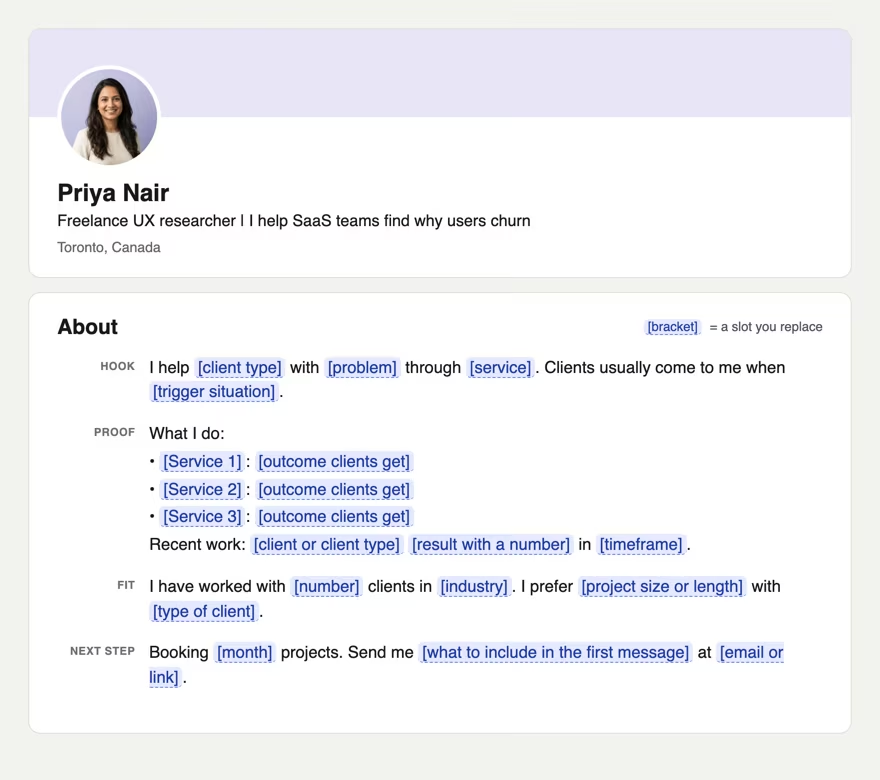
I help [client type] with [problem] through [service]. Clients usually come to me when [trigger situation].
What I do:
• [Service 1]: [outcome clients get]
• [Service 2]: [outcome clients get]
• [Service 3]: [outcome clients get]
Recent work: [client or client type] [result with a number] in [timeframe].I have worked with [number] clients in [industry]. I prefer [project size or length] with [type of client].
Booking [month] projects. Send me [what to include in the first message] at [email or link].
Name the trigger situation in the hook, such as a failed launch or a new hire. It tells the right client that you solve their exact moment. Then use the recent work line for your most relevant result, not your biggest.
Template for career changers
Use this one when your work history looks unrelated to the role you want. It says why you moved, then shows what carried over and what you added.
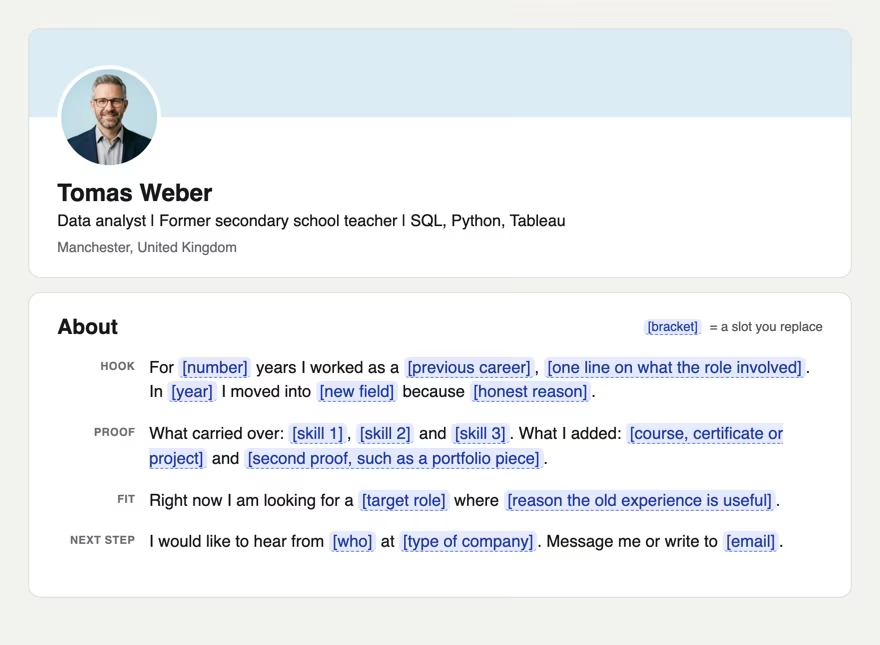
For [number] years I worked as a [previous career], [one line on what the role involved]. In [year] I moved into [new field] because [honest reason].
What carried over: [skill 1], [skill 2] and [skill 3]. What I added: [course, certificate or project] and [second proof, such as a portfolio piece].
Right now I am looking for a [target role] where [reason the old experience is useful].
I would like to hear from [who] at [type of company]. Message me or write to [email].
The honest reason is the bracket readers remember. Write it as one plain sentence, with no apology and no spin. Then name only the skills that the new role really uses, and leave the rest out.
Template for students
Use this one when you have little or no work history. It leans on projects, clubs and tools, and it asks for a specific kind of internship.
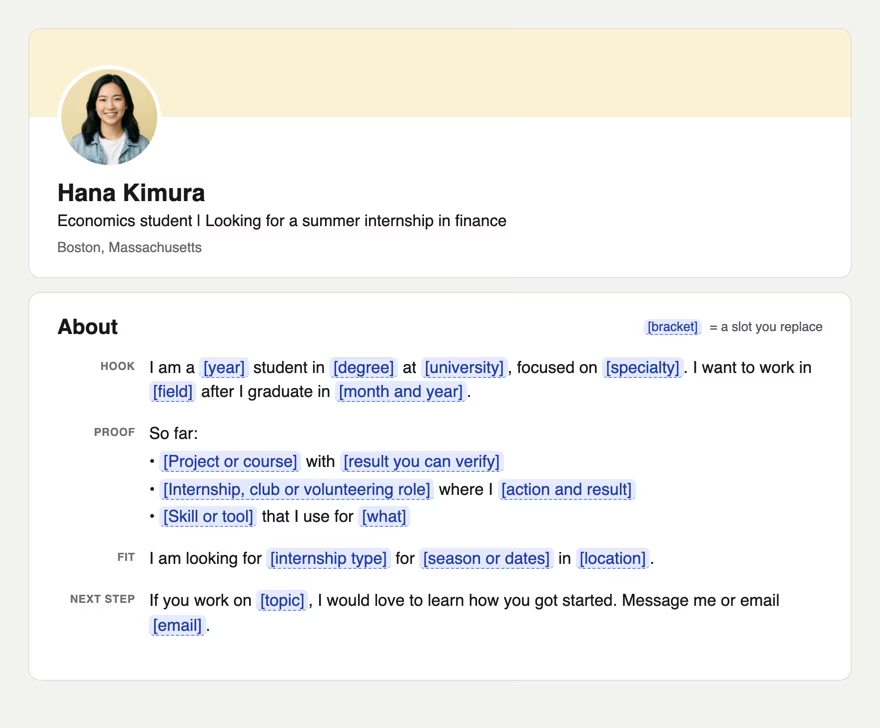
I am a [year] student in [degree] at [university], focused on [specialty]. I want to work in [field] after I graduate in [month and year].
So far:
• [Project or course] with [result you can verify]
• [Internship, club or volunteering role] where I [action and result]
• [Skill or tool] that I use for [what]I am looking for [internship type] for [season or dates] in [location].
If you work on [topic], I would love to learn how you got started. Message me or email [email].
Swap the internship line for a graduate role when you are in your last term. Everything else in the template stays as it is. Update the dates each term, because a stale graduation date is the first thing a recruiter reads.
How to fill the brackets so the text sounds like you
Fill each bracket with a fact a stranger could verify, not an adjective. A bracket filled with "great results" reads as filler, while one filled with "cut onboarding time from 14 days to 6" reads as proof.
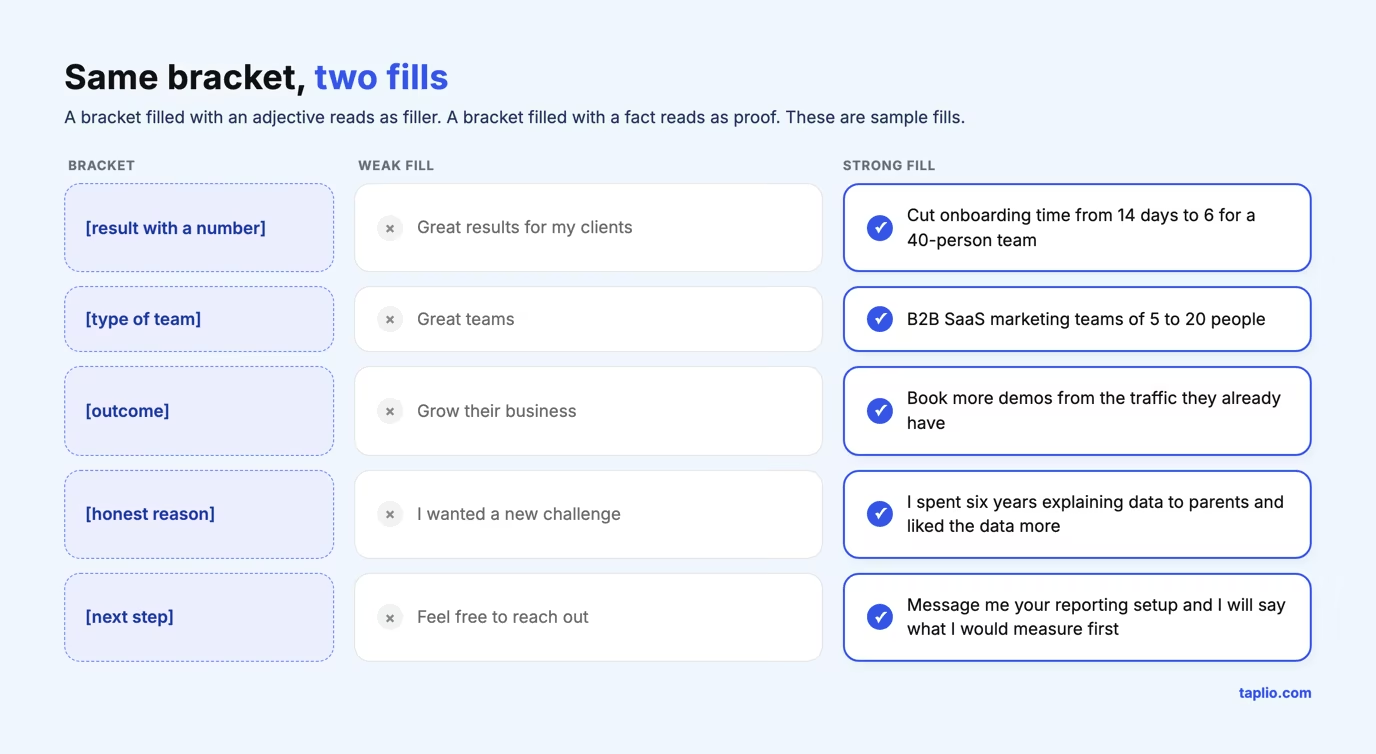
Take the proof bracket in each version. The job seeker writes a result from the last role, the founder writes a customer count, the freelancer writes one client outcome, the career changer writes a project that shows the new skill, and the student writes a course or club result. The slot is the same and the fact comes from a different place.
Four rules cover most of the work:
- One reader per template. Write [who you help] for a single person, such as a head of marketing at a 50-person SaaS company, then widen it only if you must.
- Numbers beat adjectives. A count, a percentage, a timeframe or a named tool is enough for every proof bracket.
- First person, plain verbs. Write "I help" and "I built", not "a results-driven professional".
- Read it aloud. If a sentence needs a breath in the middle, split it where the bracket ends.
Keywords belong in the brackets too. Put the job title and the two or three skills a recruiter would search for inside [target role] and [skill or tool], so the text reads naturally and still matches the words people type. The same rule applies to your headline, and the LinkedIn headline examples show how finished lines carry the title and the skills together.
What to put in a bracket when you have nothing to fill it with
When a bracket has no number behind it, fill it with the size of the work, the tool you used or the thing you shipped. A proof slot only has to be checkable, and a count of scope is checkable.
- No metrics yet: write the scope. "Managed a 3-person content calendar" or "wrote 40 product pages" works where a percentage does not exist.
- Confidential results: describe the shape. "A top 5 retailer" or "a Series B fintech" names the client type without naming the client.
- No clients or employers: use a project you built, a course you finished or a club you ran, and name the tool you used.
- No honest reason for a switch: say what you noticed. "I liked the reporting more than the teaching" is a reason.
- No email you want to share: replace the bracket with the action, "send me a message here", and delete the address.
If a bracket still has nothing in it, delete the sentence around it. A shorter text with four filled slots beats a long text with a gap in it.
Short and long versions of the same text
The same four slots stretch or shrink to fit the time a reader gives you. Use the short version when you want a clean profile with no story, and the long version when the reason behind your work is what sets you apart.
Short version, three lines:
I help [who you help] [outcome].
[Result with a number].
Message me about [topic] at [email].
Long version, five slots: add a story slot between the hook and the proof, then keep everything else.
I help [who you help] [outcome].
Why I do this: [one sentence on the moment that started it].
What I have done:
• [Result with a number]
• [Second result with a number]I work best with [type of team or client] that [how they work].
Message me about [topic] at [email].
The long version still fits the one or two paragraph guidance from LinkedIn Help if each slot stays at a sentence or two. When a slot grows past that, cut the slot, not the next step.
Mistakes that make a template obvious
A template becomes obvious when the brackets are gone but the sentences still sound like a form. Five mistakes cause it.
- Brackets left in. A live profile that says "[company type]" tells every visitor that nobody read it back.
- Buzzwords in the brackets. "Passionate", "dynamic" and "results-driven" fill the slot and prove nothing.
- Every slot at full length. A reader skims, so a slot that runs to five sentences hides the one that matters.
- One template for every audience. A text aimed at recruiters and clients at once speaks to neither, so pick the reader who matters most this year.
- A hook about you instead of the reader. "I am a seasoned professional" says less than "I help finance teams close the books in 5 days".
The fix is the same each time: rewrite the bracket until a stranger could check the sentence.
Check the text before you save
Check three things before you save: no bracket is left, the first lines stand alone, and the About text agrees with your headline. Skip the first check and a template can go live with "[company type]" still in it.
- Search for the bracket character. Paste the text into a plain editor, search for "[" and clear every hit.
- Read only the first two lines. They should name who you help or the role you want without the rest of the text.
- Match the headline. If the hook says "marketing analyst", the headline should say it too. The LinkedIn headline generator drafts one from the same facts.
- Run it through a second reader. The free LinkedIn summary generator rewrites a weak About section, and LinkedIn profile optimization scores the full profile.
Keep the filled text in a note on your phone or computer as well. When your role or results change, you replace one bracket and paste again instead of rewriting the whole section.
Do the same check again after three months. A template filled once and never touched ages as fast as the role it describes.
Frequently asked questions
Is there a free LinkedIn about me template?
Yes. The five templates on this page are free to copy. Select the text under a picture, paste it into a plain text editor, replace each bracket and paste it back into the About section of your profile.
How long should a LinkedIn about me section be?
LinkedIn Help advises one or two paragraphs and allows bullet points. A four slot template lands near that length, at 4 to 7 sentences or list items. LinkedIn Help states no character count on its About section pages, so stop when the four slots are filled.
What should a student write in the LinkedIn About section?
A student should write the field they aim at, two or three projects or roles with a result, the tool they use and the kind of internship they want. The student template above has a bracket for each. A course project with a verifiable outcome counts as proof.
Can I copy a LinkedIn about me template into Word?
Yes. Copy the text from the page into Word or any other editor, replace the brackets there, then paste the result into LinkedIn. Draft in plain text, so no hidden formatting travels with the paste, and check the line breaks after you paste.
What is the best way to start a LinkedIn about me section?
Start with who you help and what changes for them, or with the role you want if you are job hunting. The first lines are what a visitor sees before the rest of the text, so they must work alone. All five templates open with the hook slot for that reason.
Can AI write my LinkedIn about me section?
AI can draft one from facts you give it, and a template tells you which facts to collect. Fill the brackets first, then ask a tool to smooth the sentences. Never let it invent a number for [result with a number].


Keep reading
All articlesRelated Articles


Your Linkedin AI coach is waiting for you
Join 12,000+ creators who let their coach turn the blank page into a plan and watch their audience compound.
7-day free trial · Cancel anytime